Using Segmentation to Improve Sponsorships & Activations
What do you think of when you hear the phrase “diverse sponsorships?”
During development, AX can be overlooked because content is being entered by the agency's staff, and they’re familiar with the back-end. So when a WordPress site is handed over to the client with shiny new user logins, some questions can remain unanswered such as: What dimensions should the images be? How long should the text be? What colors should I use? Here are some tips for improving the author experience in WordPress.
A key component of website deliverables is the documentation. When we, the agency, deliver a project, there are at least two pieces of supplementary documentation that we provide to the client.
While supplemental documentation is necessary, it can pose some problems as it pertains to the AX.
Contextual documentation, also known as self-documentation, is another method to document that provides relevant help where it makes sense within the framework. Contextual documentation differs from supplemental documentation in that it's a part of the user interface. The author does not have to search through emails or PDFs to find style information such as colors, font sizes, or image dimensions, or technical information such as editing content or how categories are being used.
Below, I'm going to cover some methods to add contextual documentation for WordPress authors: Administration page help tab, image dimensions recommendation, post excerpt character counter, and a custom brand color palette to all WordPress color pickers.

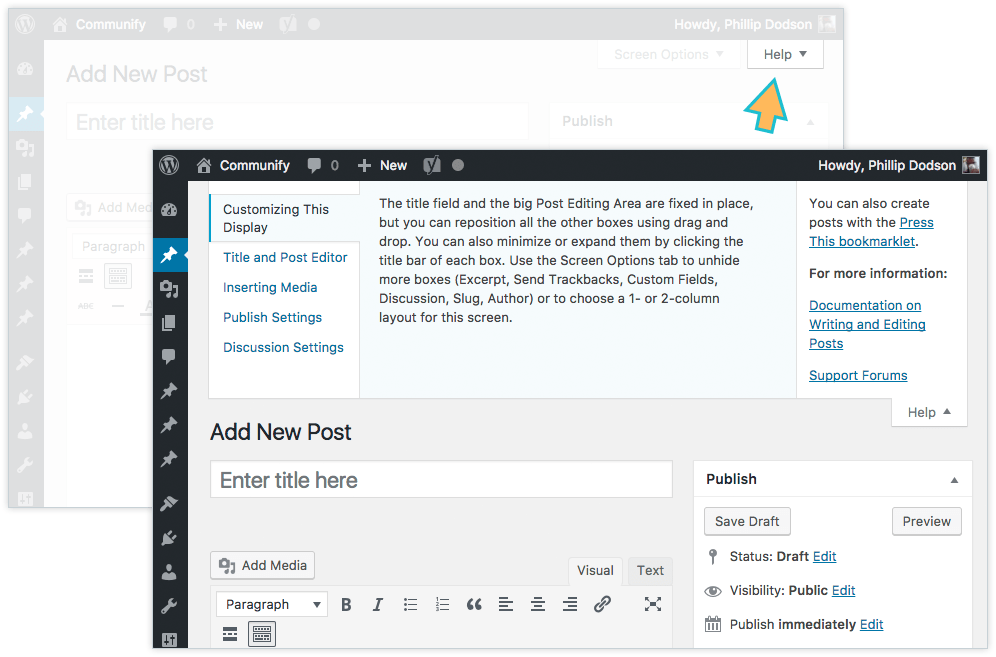
WordPress has built-in support for help tabs on administration pages and includes tabs on all default pages. The problem is that when custom post types are added, developers often forget to add help to explain what the post type does and how any changes affect the site.
<?php
/**
* Add a help tab to the new/edit post screen.
* Action: admin_head-post.php, admin_head-post-new.php
*/
function cmfy_add_gumbo_help_tab() {
// Get the WP_Screen object
$screen = get_current_screen();
// Adjust / remove this conditional depending on which hook you're firing on
if ( 'comm_cpt_gumbo_ingr' == $screen->post_type ) {
$screen->add_help_tab( array(
'id' => 'gumbo-info',
'title' => __( 'Usage', 'cmfy' ),
'content' =>
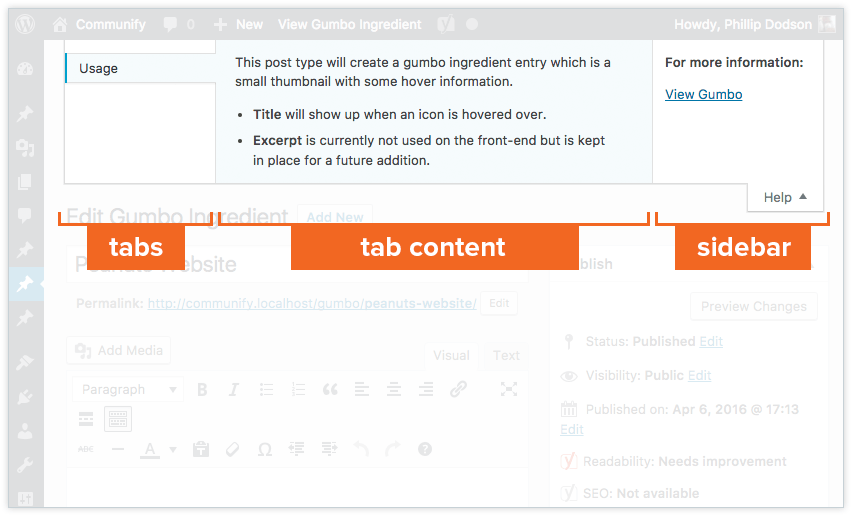
'<p>' . esc_html__( 'This post type will create a gumbo ingredient entry which is a small thumbnail with some hover information.', 'cmfy' ) . '</p>' .
'<ul>' .
'<li>' . __( '<strong>Title</strong> will show up when an icon is hovered over.', 'cmfy' ) . '</li>' .
'<li>' . __( '<strong>Excerpt</strong> is currently not used on the front-end but is kept in place for a future addition.', 'cmfy' ) . '</li>' .
'</ul>'
) );
$screen->set_help_sidebar( __( '<p><strong>For more information:</strong></p><p><a href="/gumbo">View Gumbo</a></p>', 'cmfy' ) );
}
}
/**
* Change actions depending on which screen you want the help tabs.
* In this case, I want this help tab to fire on new / update post type.
* I am restricing which post type with a conditional post type lookup inside of
* the callback. For example, if you wanted to add a help tab to the
* general options page, hook into 'admin_head-options-general.php'.
*/
add_action( 'admin_head-post.php', 'cmfy_add_gumbo_help_tab' );
add_action( 'admin_head-post-new.php', 'cmfy_add_gumbo_help_tab' );
Often times, post featured images have recommended dimensions or aspect ratios. WordPress can automatically crop images when necessary but it may be helpful to let the author know the ideal dimensions for the best result.
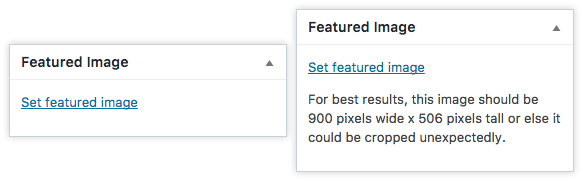
The above image is a result of the following code.
<?php
/**
 * Add guidance text to the featured image metabox.
 * Filter: admin_post_thumbnail_html
 *
 * @param  string   $content  Meta box HTML
 * @param  integer  $post_id  ID of post
 * @return string
 */
function cmfy_featured_image_help_text( $content, $post_id ) {
	// Limit text to certain post types
	if ( 'page' == get_post_type( $post_id ) ) {
		$content .= sprintf( '<p>%s<p>', __( 'For best results, this image should be 900 pixels wide x 506 pixels tall or else it could be cropped unexpectedly. ', 'cmfy' ) );
	}
	return $content;
}
add_filter( 'admin_post_thumbnail_html', 'cmfy_featured_image_help_text', 10, 2 );
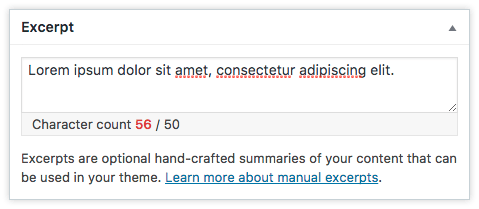
Excerpts are another location where the developers can provide the author some guidance. Often, designs depend on excerpts of a certain length, and the theme will truncate any longer text so as not to break the layout. However, truncation is not a content strategy.
“A Responsive Design Workshop” Karen McGrane & Ethan Marcotte
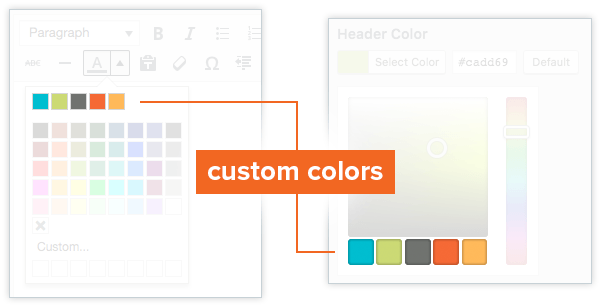
Don’t let all of those carefully crafted brand colors go to waste! There are two different color pickers in WordPress. The first is the TinyMCE color picker which is used to select colors while editing a post. The second is the Iris color picker that is used for all other color selection options such as the theme customizer.
<?php
// Custom theme colors
$cmfy_custom_colors = array(
'14bed2' => __( 'Primary blue', 'cmfy' ),
'cadd69' => __( 'Primary green', 'cmfy' ),
'70736f' => __( 'Primary gray', 'cmfy' ),
'f26722' => __( 'Secondary orange', 'cmfy' ),
'fdbb4a' => __( 'Secondary yellow', 'cmfy' ),
);
/**
* Customize TinyMCE text color picker.
* Filter: tiny_mce_before_init
*
* @param array $init Initialiation array for TinyMCE
* @return array
*/
function cmfy_set_colors_tinymce( $init ) {
global $cmfy_custom_colors;
/**
* Array to hold custom colors.
* Note that this not an associative array.
* Each color takes up two array elements.
*/
$colors_custom = array();
foreach ( $cmfy_custom_colors as $color => $label ) {
$colors_custom[] = $color;
$colors_custom[] = $label;
}
/**
* I like the custom colors to take up the entire
* first row. However, if there are only a few colors,
* the color picker becomes too narrow and tall,
* so this adds blank squares to help stretch it out.
* This block can be removed if you don't want placeholders
*/
$_num_of_cols = 8;
while ( count( $colors_custom ) / 2 < $_num_of_cols ) {
$colors_custom[] = '_hide';
$colors_custom[] = '';
}
/**
* Original colors.
* @see wp-includes/js/timemce/langs/wp-langs-en.js
*/
$colors_original = array(
'000000', 'Black',
'993300', 'Burnt orange',
'333300', 'Dark olive',
'003300', 'Dark green',
'003366', 'Dark azure',
'000080', 'Navy Blue',
'333399', 'Indigo',
'333333', 'Very dark gray',
'800000', 'Maroon',
'FF6600', 'Orange',
'808000', 'Olive',
'008000', 'Green',
'008080', 'Teal',
'0000FF', 'Blue',
'666699', 'Grayish blue',
'808080', 'Gray',
'FF0000', 'Red',
'FF9900', 'Amber',
'99CC00', 'Yellow green',
'339966', 'Sea green',
'33CCCC', 'Turquoise',
'3366FF', 'Royal blue',
'800080', 'Purple',
'999999', 'Medium gray',
'FF00FF', 'Magenta',
'FFCC00', 'Gold',
'FFFF00', 'Yellow',
'00FF00', 'Lime',
'00FFFF', 'Aqua',
'00CCFF', 'Sky blue',
'993366', 'Brown',
'C0C0C0', 'Silver',
'FF99CC', 'Pink',
'FFCC99', 'Peach',
'FFFF99', 'Light yellow',
'CCFFCC', 'Pale green',
'CCFFFF', 'Pale cyan',
'99CCFF', 'Light sky blue',
'CC99FF', 'Plum',
'FFFFFF', 'White',
);
// Create complete colors array with custom and original colors
$colors = array_merge( $colors_custom, $colors_original );
/**
* Begin textcolor parameters for TinyMCE plugin.
* @link https://www.tinymce.com/docs/plugins/textcolor/
*/
$init['textcolor_map'] = json_encode( $colors );
/**
* Colors are displayed in a grid of columns and rows.
* Set the number of columns to match the number of custom colors,
* this way our colors make up the first row so they're easier to identify quickly.
* Halve the count since each color has two array entries.
*/
$init['textcolor_cols'] = count( $colors_custom ) / 2;
// Set number of rows
$init['textcolor_rows'] = ceil( ( ( count( $colors ) / 2 ) + 1 ) / $init['textcolor_cols'] );
return $init;
}
add_filter( 'tiny_mce_before_init', 'cmfy_set_colors_tinymce' );
/**
* Adjust TinyMCE custom color styling grid
* Action: admin_head
*/
function cmfy_style_custom_colors_timymce () { ?>
<style type="text/css">
/* Add padding after first row */
.mce-colorbutton-grid tr:first-of-type td {
padding-bottom: 10px;
}
/* Hide the filler blocks */
.mce-colorbutton-grid tr:first-of-type td div[data-mce-color="#_hide"] {
visibility: hidden;
}
/* Fix spacing issue with the "transparent" block */
.mce-colorbtn-trans div {
line-height: 11px !important;
}
</style>
<?php }
add_action( 'admin_head', 'cmfy_style_custom_colors_timymce' );
/**
* Customize Iris color picker.
* Inspired by @link https://wordpress.org/plugins/iris-color-picker-enhancer/
* Action: admin_footer, customize_controls_print_footer_scripts
*/
function cmfy_set_colors_iris() {
global $cmfy_custom_colors;
if ( wp_script_is( 'wp-color-picker', 'enqueued' ) ) : ?>
<script type="text/javascript">
jQuery.wp.wpColorPicker.prototype.options = {
palettes: [
<?php foreach ( array_keys( $cmfy_custom_colors ) as $color ) {
echo "'#$color',";
} ?>
]
};
</script>
<?php endif;
}
add_action( 'admin_footer', 'cmfy_set_colors_iris' );
add_action( 'customize_controls_print_footer_scripts', 'cmfy_set_colors_iris' );


What do you think of when you hear the phrase “diverse sponsorships?”

Come June,we can expect to see the usual suspects up in arms about brands engaging in (or even supporting) LGBTQ+ Pride campaigns. Of course, not...

First things first: what is a podcast?